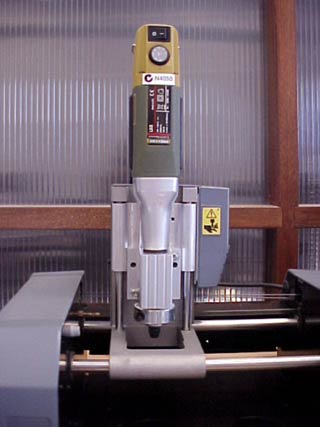
Motor Mount Installation & Use
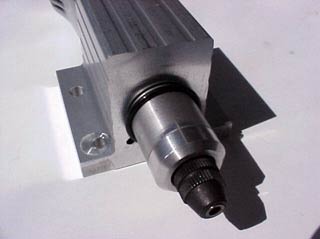
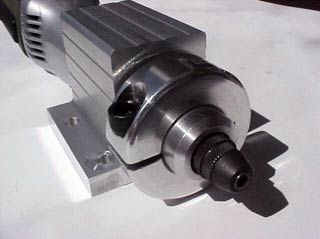
1. Check the contents of the kit as received. We will describe the 20mm kit here as an example. You'll find a precision milled aluminum motor mount. It has a precision bore with a small clearance to slip over the Proxxon 28485 tool. Follow the steps to see "which way round". One end is chamfered to accept the mating Proxxon chamfer, for truly central seating. The other end is also chamfered, to accept the included rubber damper ring which prevents movement while centering the Proxxon against the stop collar. There's a single-piece aluminum stop collar with socket head M6 screw (1/4" socket screw with the one-inch kit). Finally, a pair of stainless steel M4 x 20mm clamp screws to fix the assembly to your MDX-15/20. Here's what the kit looks like:
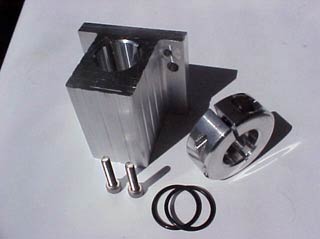
Why two rubber damper rings? Because you're sure to lose one eventually. Please only use one at a time and ONLY between the bottom of the motor mount and the top of the stop collar.
You already have in your MDX-15/20 original toolkit, the correct 3mm A/F hex key to tighten the stainless M4 clamp screws. The M6 stop collar screw needs a standard 5mm A/F hex key.
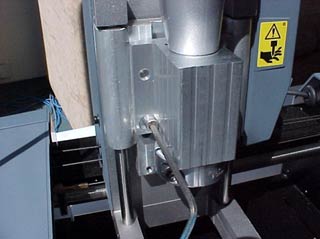
2. Check the position of the four holes in the aluminum mount as the Proxxon is slipped into it. See the pic below for correct orientation. The spot-faced pair of holes later will take the stainless M4 clamp screws. The other, plain pair of holes let you register the motor mount over two black studs on your MDX, in the standard Roland "low" mounting position. They are empty when you choose the Roland "high" mounting position.
This way round:
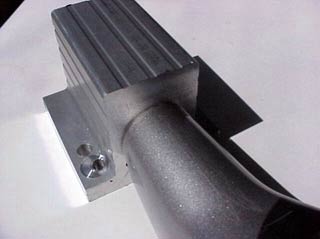
On the nose of your Proxxon is a round aluminum nut (no, not the knurled, black, steel collet nut!) which you may loosen with your fingers if it prevents you easily sliding the Proxxon into the mount. Re-tighten it with your fingers later. It retains the lower Proxxon bearing.
3. Next, slip one rubber damper ring over the Proxxon snout . You won't be using the second ring now - it's a spare. The damper ring engages with chamfers on the motor mount and the stop collar, to keep the lower end of the Proxxon snout correctly centered. It also damps vibration very effectively.
4. Smooth side out for the stop collar, please. Grooved side towards the motor mount, where the chamfers of the motor mount and stop collar will engage the damper ring.
5. To set the stop collar, press its exposed face against the edge of a solid object like a bench, to squeeze the damper ring quite hard. Then gently tighten the collar.
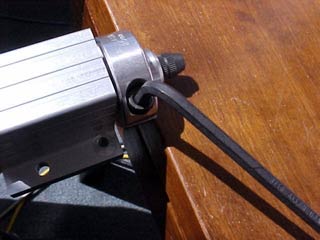
If you lean on the Proxxon, your hands will be free to set the stop collar gently. You are not trying to crush the Proxxon, just to keep the rubber damper ring compressed. Start the Proxxon at 5000 /min and listen to the sound. While the motor is running, loosen the stop collar again. If the motor speeds up substantially, you had the M6 collar screw too tight. Re-fix the collar screw more gently, with the Proxxon pressed hard onto the damper ring.
6. Choosing the position - "low" or "high":
Mount in "low" position
Mount in "high" position
Two plain holes (NOT the spot-faced holes for M4 screws) let you lock the motor mount in the classic Roland MDX-15/20 "low" or "high" positions. This allows you to mount short-shank tools low enough they can penetrate the work deeply if needed. Or you can mount long-shank tools high enough they won't travel too deeply and hit the table. Be careful with long shank tools, to engage them generously in the Proxxon collet, properly tightened too! Never spin long, slim tools too fast, or you risk bending the tool under centrifugal forces, with disastrous results. Take the advice of your cutter supplier.
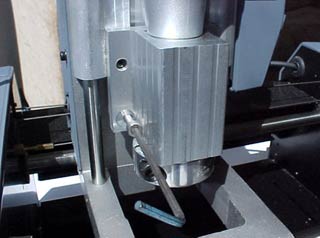
When your new spindle (20mm or 1") is mounted in the Motor Mount and fixed to the MDX-15/20, your range of Y milling motions will be same as before, but offset to the front of the MDX by 6.60mm. To provide clearance between a range of spindle bodies and the Roland mechanism, we decided not to shift the spindle center further to the rear.
Please allow for this 6.60mm shift when using XYZ work-holding fixtures such as clamps and vices. Please reduce your usual table setback by 6.60mm when using the Fourth Axis rotaries.
Always maintain the MDX acrylic safety cover in place when cutting, for your protection. Use safety glasses when appropriate and keep hair and clothing short (or tied back) so you don't get caught in the rotating spindle.